


Before we move on to what was promised on Wednesday about gear for wildlife photography and rain protection, let’s first cover the final part of my RawTherapee workflow.
In the first part of my RawTherapee workflow, I covered the Exposure section using Adobe Camera Profiles. After that, I discussed Sharpening in RawTherapee, and today we’ve reached the final part of my workflow: noise reduction.
This time, I also compared RawTherapee with another noise reduction tool, Topaz Denoise AI. Although I could have compared it with Adobe or even Darktable, Topaz has become one of the most talked-about and widely used applications in recent years. But is it truly as good as people say? That’s why I’ve included a review or, more accurately, a comparison of results. But first, a bit about RawTherapee itself:
RawTherapee is my top choice for developing raw photos. In my opinion, it is the best free raw developer available, compatible with all operating systems, including Windows, MacOS, and Linux.
Some people might prefer Darktable, an open-source photography application that is perhaps closest to Adobe Photoshop. Additionally, there are various paid applications like Adobe and many others.
However, when it comes to pure Raw development, RawTherapee is the most powerful free application available.
RawTherapee offers a wide array of tools, but for most development tasks, you only need a few. The interface is user-friendly, even on smaller screens.
To make things even easier, you can add your most used tools to a Favorites tab. To do this, go to the Preferences menu (the equalizer icon at the bottom right), navigate to the Favorites tab, and check the tools you want to add on the left side. You can then arrange these tools on the right side according to your preference.

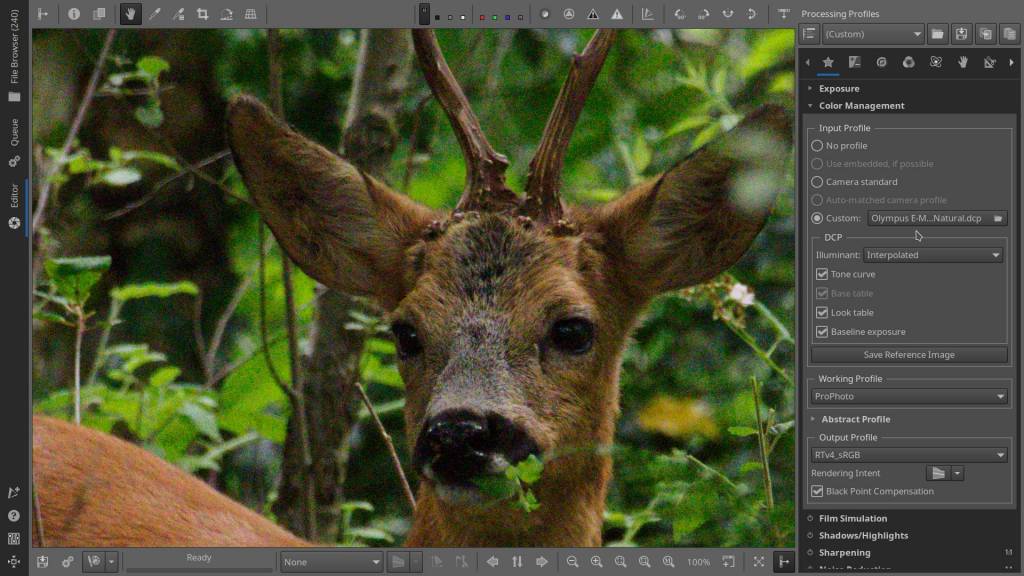
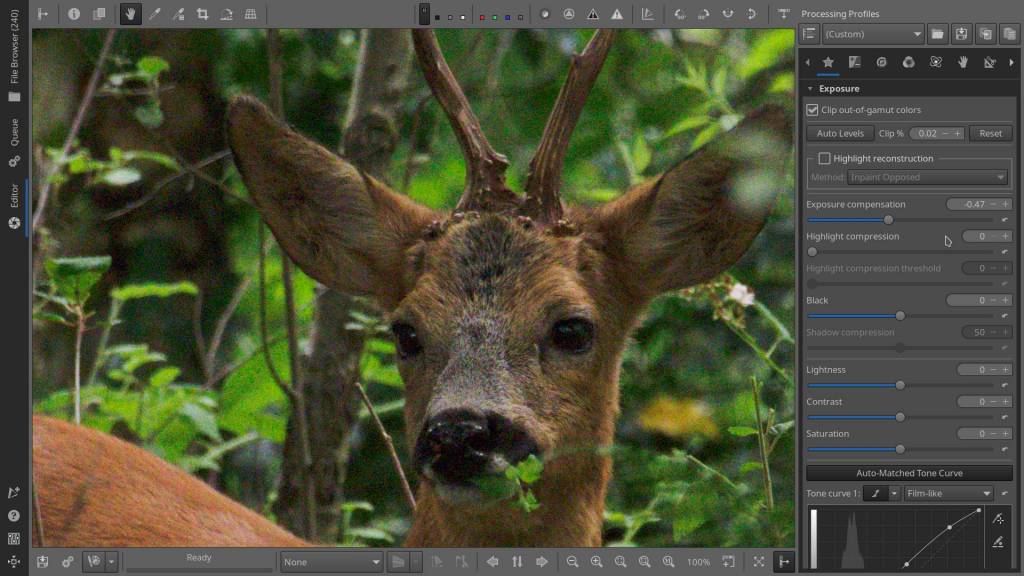
In my Favorites menu, the first four modules I’ve added are Exposure, Color Management, Film Simulation, and Shadows and Highlights. These modules all deal with the aspects of lighting, allowing me to prepare an image to look the way I want.
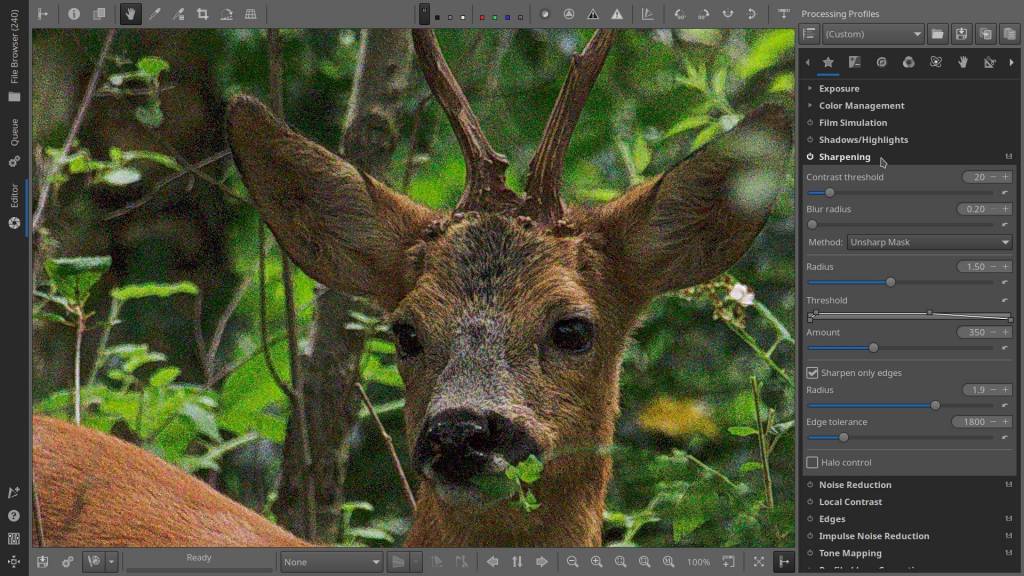
Next, I sharpen the image and then apply noise reduction. I also have four other frequently used tools included in the Favorites menu.
Now, regarding noise reduction, although RawTherapee has several additional tools, I mostly use the standard denoising option. In about 95% of cases, I keep the default settings. The mode is set to Conservative, and I adjust the Luminance using the slider. As a starting point, I set the Luminance slider to 50, which works well for most images with ISO values up to 3200 or 6400.

I start with the Detail Recovery slider set to 100, where no noise reduction is applied. Then, I gradually move the slider to the left (a value lower than 100) until almost all the noise is removed. Finally, I gently move the slider back and forth to find the optimal balance between minimal noise and high detail. To see this clearly, I set the image zoom to 1:1 (100%) or even one click higher (200%). After this step, the image is fully processed and can be saved.


For images with more noise, possibly due to high ISO, you can start by increasing the initial Luminance value from 50 to 75 or 100 if needed. If the noise is still too strong, switch the Mode to Aggressive. Sometimes, white or colored artifacts remain, especially in areas like the eyes of a deer. These can be removed by lowering the default Gamma value, but keep in mind that this also makes the overall image softer.
Voilà, this is the denoising workflow I use.
I’ve also included a video to visually demonstrate the denoising process.
Some time ago, I experimented with sharpening and denoising using AI. Naturally, I first looked for online services that could do this for free. Nowadays, if you search online, you’ll find many websites offering these services. I tried Vance AI, but to cut a long story short, the results were far from impressive, and in the end, not free either.
Then there’s Topaz Denoise AI, which seems to be everywhere these days. It’s as if everyone is using it – though that’s probably not the case – but I wanted to see if it lives up to the hype. So, I explored the Topaz website: https://www.topazlabs.com/denoise-ai.
The first “image compare” photo I encountered, just below the logos of sites like DPReview and others, featured a light blue/grey bird with darker blue wings. Here, I noticed that the fine details in the wings were completely gone and looked fuzzy.
Next, there were four smaller “image compare” pictures, but they were so small that no detail could be seen.
Below those was a cropped photo of a bird of prey. The AI was supposed to extract much more detail from the RAW image using additional sensor information, particularly around the eye and feathers. However, I couldn’t notice much detail, just blurriness and a lack of contrast. The same issue persisted with the next two “image compare” pictures that Topaz used to showcase their software’s capabilities.
On the Topaz website, you can download the RAW versions of these three photos to test – but with what, after you’ve already bought their software? So, I downloaded them to test in RawTherapee.
The pictures below are cropped to roughly the same size as the examples on the Topaz website. These are significant crops since the original images are much larger. Two of the photos were taken with a Sony ILCE-9 and the bird of prey with a Canon EOS 5D. All three images are very high ISO – 8000, 10,000, and 16,000 ISO.
In the “image compare” pictures below, the left side shows the JPEG result after sharpening, and the right side shows the JPEG result after denoising as well. For all three pictures, I applied a sharpening radius of 1.50 and an amount of 350, edges only. Denoising was done in Aggressive mode, and here are the results. I’ll leave the judgment to you, but personally, I think RawTherapee holds its own quite well, even though the AI used for denoising in this case was me 🙂 The first deer image looks decent in RawTherapee, the second is unusable as a photo, and the third, the bird of prey, looks much better in RawTherapee to me, sharper ! – but to each their own.
By the way, out of curiosity, I looked up Topaz AI on DPReview, whose logo they mention, and honestly, it doesn’t seem all that perfect to me.
What I’m really happy with is RawTherapee !
DPReview : https://www.dpreview.com/forums/thread/4715363
https://www.dpreview.com/forums/post/67027341
The three test images shown below are sample files provided by Topaz Labs at https://www.topazlabs.com/denoise-ai. The bird photo is by Hillary Fox, and the two deer photos are by Brian Matiash. Open a second tab in your internet explorer and open the website above to compare the pictures visualy.
Regarding the examples on Topaz’s website, I personally find the results from Adobe so poor that it raises suspicion—they may have intentionally made them look bad to make their own product seem superior. However, there’s something off about that too. Even the photos and results from Topaz itself aren’t great. They claim enhanced details, but the details appear blurry. It’s all very confusing.
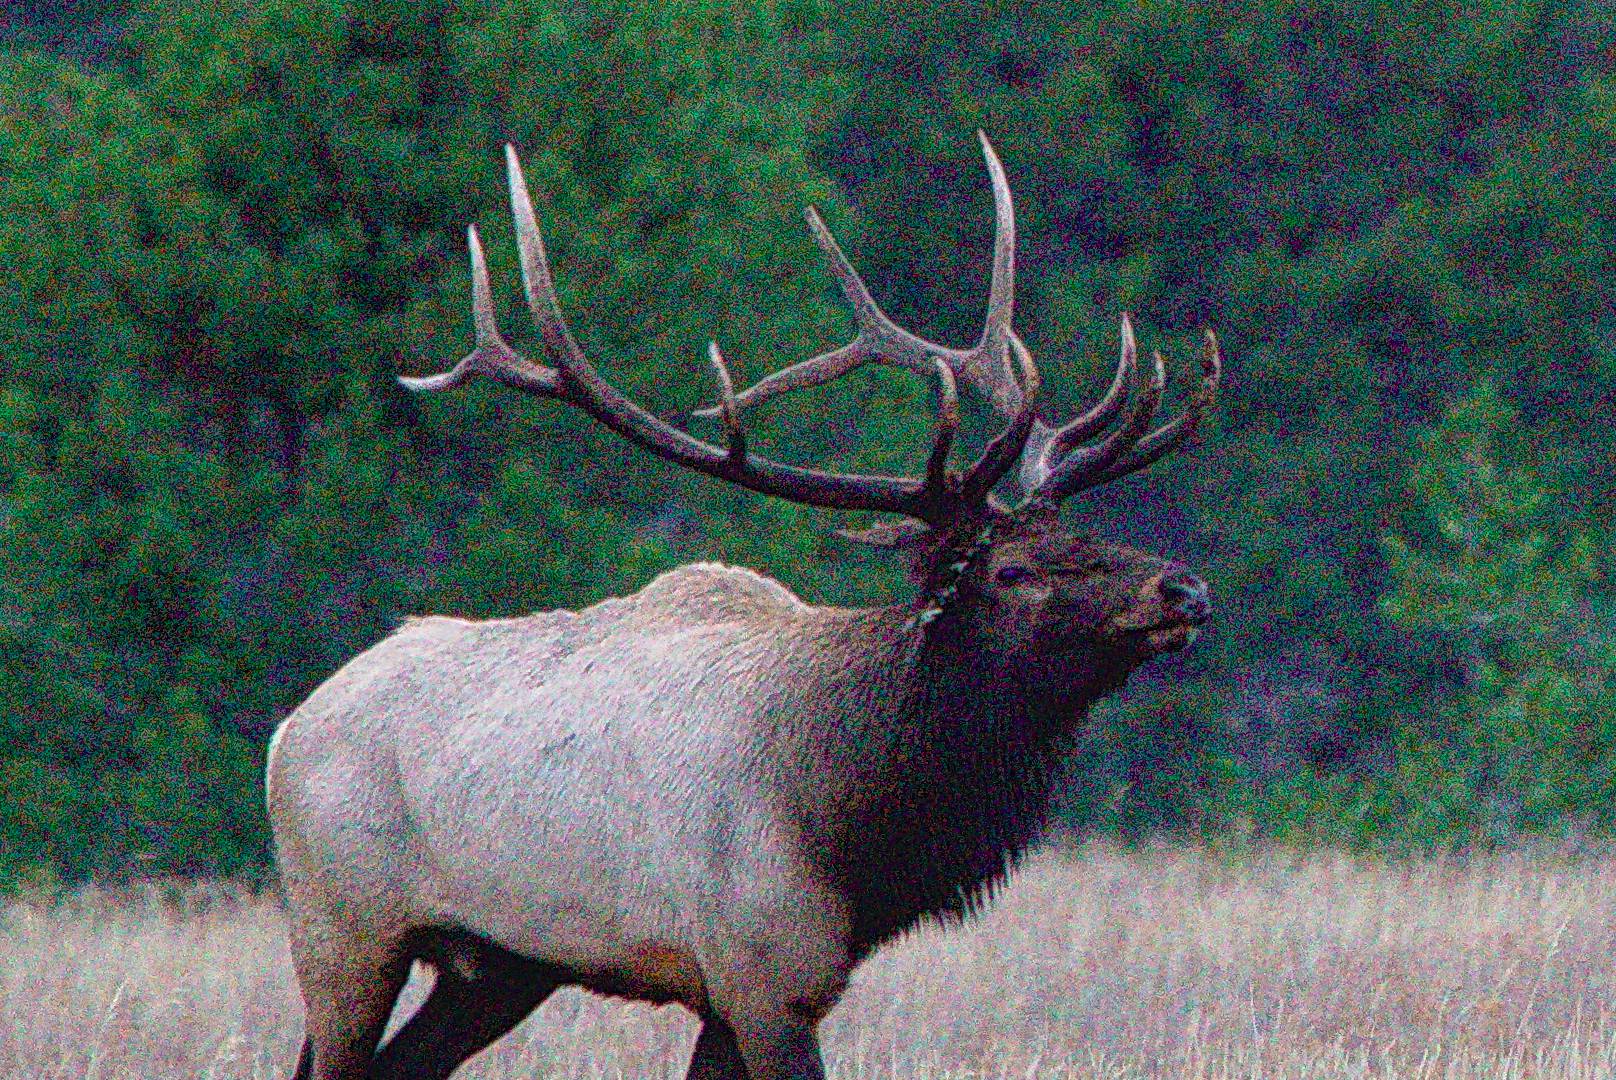


I would like to thank Brian Matiash and Hillary Fox for their example photos and for making them available for testing and comparison via https://www.topazlabs.com/denoise-ai
This article was written by Marc R. with the assistance of ChatGPT, an AI language model developed by OpenAI.


knappe resultaten en deskundige uitleg Marc
prettige dag
LikeLike
Dankjewel Willy, ik hoop dat iemand er iets aan heeft. Fijn weekend !
LikeLike
Thanks Marc. I own loads of denoise software, and often notice that Darktables denoise in most situations is as good as Adobe/ON1/Luminar etc. It is just an matter of knowing how to use it.
Fantastic article again!
LikeLiked by 1 person
Thanks Mark, well that was my intention too, to save people from spending a lot of money on something they may already have.
And the differences between paid or free software is sometimes small, it’s like you say – you only have to know how to use it.
LikeLiked by 1 person